How to Manage Voting in the Viewing Interface
For some Awards, Judges/Viewers are required to cast votes on and rank the entries to decide on nominations and winners. With Nucleus there is a functionality that allows you to set up voting directly from the Viewing Interface. You can apply the maximum number of votes submitted and if these votes should be ranked on a per category basis.
Ranking will give Voters the opportunity to state their preferences on entries. Please consider that if you don’t switch the ranking on that the order of voting preferences will not be reported, as Voters will simply cast their votes on X number of entries. With ranking, you can collect two types of information as voters can:
- Make a selection of their favourite entries
- Assign an order of preference for their selected entries
For this reason, it is useful to create a ranking logic by setting specific parameters. For example, you could set a number of points for each ranking position.
At the end of the whole process, you can run a Report with all the information you wish to retain from voting and manipulate all the data you need.
How to Turn On Voting
The first thing to action is to set up voting. Follow these steps to enable it:
- Log into the Admin Interface
- Go to Awards
- Select the relevant award
- Go to Overview > Settings
- Scroll down to the Viewing section
- Scroll down to the question Allow voting in viewing site, select Yes
- Fill in the Voting pop-up message text area (optional)
- Please note that if there is more than one line of text, then the first line will be used as the title of the pop-up
- Click Save
Now that voting is enabled for the award you will need to set up voting on each categories so that the judges can vote.
How to Set Up Voting criteria for Categories
With Nucleus you have the option to personalise the criteria you wish to use for each one of your Categories. Please note that for entries to be displayed in the Voting portal, you must use Automatic Categories.
With only a few steps you can decide the maximum number of votes you want to collect from Judges/Viewers, and if you want them to be ranked. Here below you can find instructions on how to do it:
- Log into the Admin Interface
- Go to Awards>Overview>Categories
- Select the relevant Category and click on … to Edit
- Scroll down to the Voting section
- To the question Maximum Votes, select the maximum number of votes Judges/Viewers can cast. Please note that there is no upper limit on this
- Note that if the Maximum Votes field is left to 0, the following questions will not appear.
- To the question Ranked, chose your preference setting Yes/No
- Select if you wish judges to be able to Abstain in a category
- Fill in the Voting pop-up message text area (optional)
- Please note that if there is more than one line of text, then the first line will be used as the title of the pop-up
- Click Save
How to Access the Voting Site
To access the voting site you need to create a Viewer’s account. You will then be able to log into the Voting Interface and start casting votes on your entries.
- Log into the Admin Interface
- Go to Viewers
- Click on the Add button on the top right corner
- Fill in with all the required information
- Under Permission, choose the relevant Awards from the dropdown menu
- Click Save
- On the Viewer List, find the Viewer’s name you wish to login as
- Go to Actions>Login as
- The Viewer Interface will automatically display
- On the Dashboard, scroll down to the relevant Award
- A Voting box will show up. Click on My votes
- The Voting Site will open. This is how it will appear:
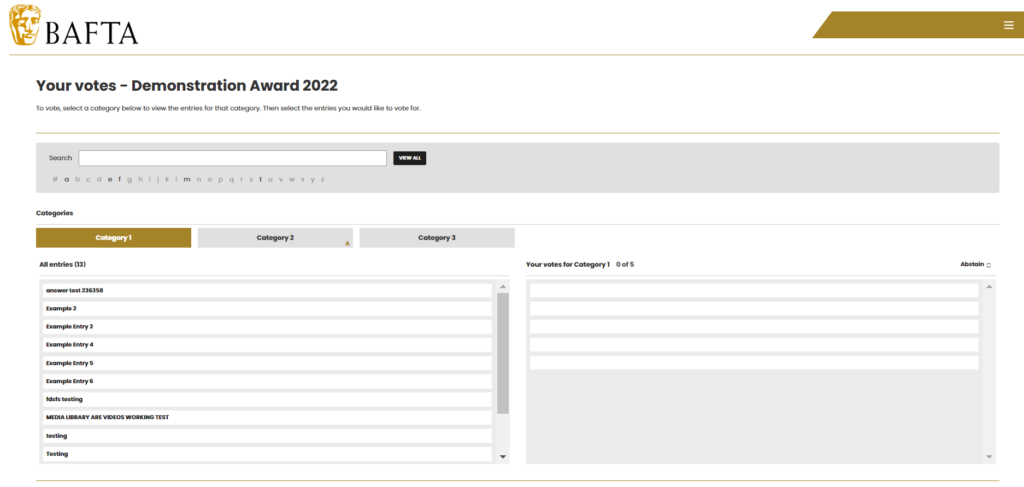
How to Cast Votes On and Rank Entries
Now that the voting site is open, you can start voting for your entries. All your categories will be displayed on the same line.
- Select the Category you want to work on. Two columns will appear:
- On the left column you will find a list of all the entries submitted in that category. Choose the entries you wish to cast your votes on by clicking on them
- On the right column the entries you chose will automatically display. Note that if you activated the Ranking option, you will be able to pull entries up and down the list simply by flipping the cursor through them
- To abstain, click on the Abstain checkbox on the top right corner
- Once completed, select Next. The next Category will follow
- Repeat the process for each category
- When you finish voting, a list of all your votes will display
- To make any amendments, click on Edit
- Once you’re done, select the Submit button
Note – Whenever you are setting up new Interfaces, it is useful to update CMS accordingly. This article will guide you through the process.
How to Check the Judges’ Voting Progress
Similarly to what happens when your Judges are scoring/commenting entries, to see the progress of your Viewers’ activity during the voting stage, do as follows:
- Log into the Admin Interface
- Go to Viewers
- The Viewers List displays. Select the Award you want to check by filtering it from the Award(s) column.
- If required, do likewise with the Category dropdown menu
- The ‘% complete’ column displays. Here you can find your Viewers’ progress expressed as a percentage
How to Display Viewers based on a specific Voting Progression Percentage
You can also toggle the list to display only those Viewers who have progressed less OR more than a certain percentage.
a) To select those who have viewed less than a certain percentage:
- Select the < under the % complete filter
- Type in the percentage figure in the box alongside
b) To select those who have viewed more than a certain percentage:
- Select the > under the % complete filter
- Type in the percentage figure in the box alongside
Note – Once you have used this functionality to gauge the progress of your Viewers, you may decide to use the Entrant Mailout functionality to send a targeted mailout to Viewers, for example a mailout/ViewerReminder email to those Viewers who have not completed their voting or have voted under a certain percentage. Note that you will need to manually copy/paste the email addresses of the relevant viewers across from the Viewing List to the Mailout field of contacts.
How to Unsubmit Votes
To unsubmit your Judges’ votes, follow these instructions:
- Log into the Admin Interface
- Go to Viewers
- The Viewer List page opens. Choose the relevant Judge
- Click on the name
- On the Voting/Scoring status section, click on the Unsubmit blue button alongside the Award
- Your Viewers’ votes will be automatically unsubmitted and Judges will be able to edit and re-submit them
- Click Save
How to Set up Voting Without An Entry Process
In some circumstances it may be relevant to want to hold a voting round without running an entry submission process. If this is the case then it is possible to administer this in existing functionality but the set-up is different. The key factor to note is that an entry form must be created by admin users in order for each item to be voted upon and for the date to display, if required in the Viewing Interface.
- Log into the Admin Interface
- Go to Awards
- Create a new award* or edit an existing one
- Scroll down to the Options section in Settings and select No for the question Show on create entry page.. This will hide the award from entrants.
- Create your own entrant user account. Go to the Entrant Interface and click Register.
- Complete all fields in the registration process.
- Go back to the Admin Interface and create the number of entries required using the Create Entry Functionality and the new entrant account you created. This guide details the process.
- Edit and submit the entries by logging back into the Entrant Interface
- You will see the entries you created in step 7 on your dashboard. Click Edit in the Actions Menu of each entry to access.
- Once all entries have been submitted log into the Admin Interface.
- Go to View Entries
- Choose the relevant award from the dropdown menu
- To bulk approve them, select Approve from the dropdown menu called Action
- Check all the required checkboxes
- Click on the OK blue button to confirm. When the confirmation screen pops up, type in I AM SURE.
The steps above detail how to create the entries as an admin user. You will still need to set up the voting and create the viewer accounts as normal. Scroll up to the section How to Turn on Voting and follow through the setup process if you have not actioned this.
*If you are creating a new award you will need to create the entry form and follow all the steps for creating an award as normal.
Helpful links
To set up judges to vote read the Setting up Viewers guide.
How to View the Votes
Once you’ve collected all your votes, you can download a report which includes both in progress and submitted votes.
- Log into the Admin Interface
- Choose Viewer Voting Download from the Reports list
- Select the Award from the list
- Choose the Status you require
- Click on Download
- A CSV file will all the information will be downloaded, and if required, you will be able to manipulate the data you need