How to Customise Invoices, Receipts and Credit notes
In Nucleus finance documents are emailed to entrants as pdf files. Much of the copy and content that is contained on the pdfs is generated from existing fields such as the organisation details or the payment structure and can not be customised.
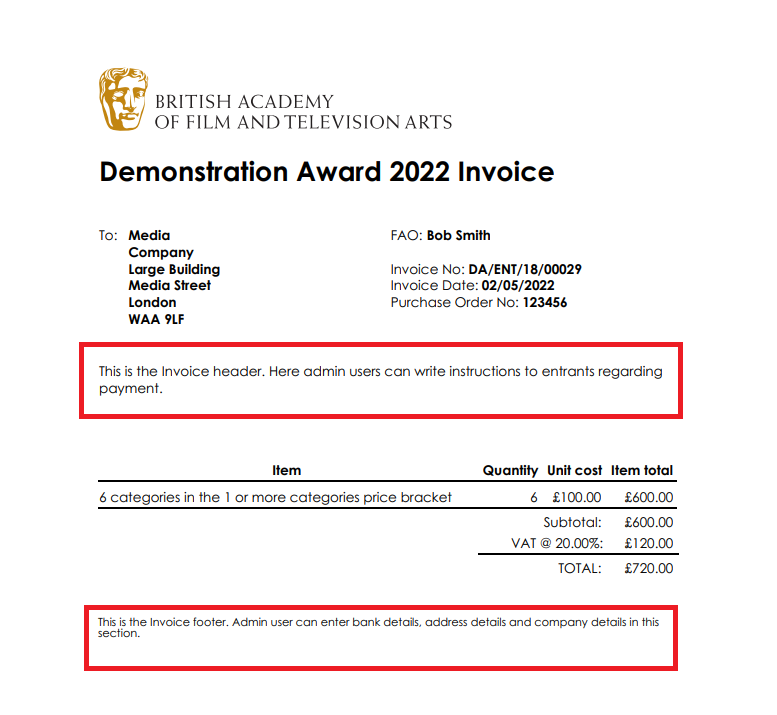
There are areas, known as CMS fields, where admin users can provide customised copy on a per award basis the top and the bottom of each document. The below is an example of an invoice with the CMS areas highlighted.

How to Provide the Copy for the Custom CMS Sections?
The copy for the sections on the finance paperwork can now be found and managed using the rich text editors on the Awards Setting page. Using these editors means admin users can provide copy and even HMTL code to style these sections if required.
- Log into the Admin Interface
- Go to Awards
- Locate the award that you wish to provide copy for and select Overview from the menu of the appropriate award in the list table
- On the next page scroll down to the Pricing section in Settings
- Make sure that the Award is set-up for payment
- Once set up scroll down to the either the Invoice, Receipt or Credit Note headers
- Under these headings there are different Rich Text editors for the following areas:
- Online and Offline Invoice Header
- Online Invoice Footer
- Offline Invoice Footer
- Online and Offline Receipt Header
- Online Receipt Footer
- Offline Receipt Footer
- Credit Note Footer
- Online Refund Footer
- Update the copy in the editors and then click Save
Note – this will only update the copy for newly generated pdfs. Documents that have been created will not be auto updated. See the Invoice Regeneration Guide for more information.
Online vs Offline PDFs
There are two footers provided for each document type. This is due to the flexibility of Nucleus Finance functions which enables admin users to control down to Organisation level how the user should pay for the invoice.
- An Offline invoice will be sent if the Award/Organisation has been set up to pay via bank transfer
- An Online invoice is sent if the Award/Organisations has been restricted to make online payments only
These options allow admin users to provide different copy for both eventualities, for example admins can omit their bank details on the online invoices resulting in forcing all users to pay online. However, equally bank details can be provided for all pdf types if required.
How to Add a Logo to the Finance pdfs
Nucleus allows admins to provide a custom logo, per instance, for the invoice, receipt and credit note pdfs. Before you add a logo you will need to make sure the image is hosted on a website, for example, a WordPress Media Library with a publicly accessible URL. It is not possible to upload images directly to Nucleus but images with a link can be applied. If you do not know html code then we recommend that you resize the image to the required size before you upload. Ensure the height does not exceed 150 px and width 500 px.
- Log into the Admin Interface
- Go to Control Centre
- Click Design Controls in the System Administration Menu
- Scroll down find Invoice Paperwork Logo URL in the Entrant Interface section
- Paste the URL in to the text area
- Click Save
- Type I AM SURE and then click OK
- To test the paperwork go to Actions>Awards and click edit. Scroll to the bottom of the page and in the Test Paperwork section click on pdf to review the logo in the documents
How to Add Entry Titles and Entry IDs to an Invoice
Invoices can be updated to include the titles of all the Entries and the relevant Entry IDs on the invoices. This can be used by Entrants to reconcile the Entries that are included on each invoice. This is particularly helpful for Entrants who split their Entries across multiple invoices so that the payment comes from different department budgets.
There are two options to display the Entry Titles and IDs on all invoices or allow Entrants to choose if they wish to display the information on their invoice. When this is optional, there is a check box on the modal just before the invoice is generated. Once the invoice is generated, it is not possible to reverse this decision.
To enable either option:
- Log into the Admin Interface
- Go to Control centre
- Select General Settings from the System Administration section
- Search for Entry Titles on Invoice
- Click Edit
- Change the value to one of the following
- None – if value is empty
- Force – all invoices with include Entry names and IDs. Value Force
- Optional – Entrants can choose to include Entry names and ID’s – Optional
If selected, Users can choose if they wish to add the Entry Titles to their invoice at checkout. An option is presented on the PO lightbox and, if checked, the Entry Titles are included.
- Click Save and Close